 Version
7 User's Guide
Version
7 User's Guide
Manual Home
CheckWriter™ Overview:
![]() Download
a .pdf of this page
Download
a .pdf of this page
Your check
drafting software runs from just one main screen. All of the
controls you will use will be accessible from here.
TO PRINT THIS PAGE, RIGHT CLICK & SELECT PRINT
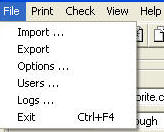
File
Menu
Import
Sample Import File
Generic WebDebit Form
Export
Options Menu
User Defined Fields
Selecting Default Payee - Autofill
File Path Options
Font Options
RCCI / EPC-6 Options for On and Off
Users - Username and Password
Logs [user log]
Print Menu
Print Blank Checks
Print Check / Draft
Print an Invoice
Print Register Reports
Check Menu
Create a New Check / Draft
Create a Duplicate
Check
Reissue Checks - Monthly Billing
Save
Delete
First | Previous
| Next | Last
View Menu
Table View
Record View
Help Menu
CheckWriter Help - Manual
About CheckWriter
Exit
Search
-------------------------Record View
Customer Information
Company
Contact
Address
City, Sate, Zip
Phone Number
Email
Transaction Types
Standard Check
Custom Check
Credit Card
Routing Number
Account Number
Signature Options
Required
Not-Required
Facsimile
Draft Information
Date
Check #
Amount
Payee
Delivery Date
Delivery Status
Print On Check
Memo
Bank Information
Bank Name
Bank City
Fraction Code
Notes
Toolbars
-------------------------Table View
Searches
Toolbars
Updates
IMPORT:
Top
This feature allows you to import the following file types:
- .txt file
- .csv file
- CheckWriter™ 5.xx database with contents
- CheckWriter™ 4.xx database with contents
- WebDebit™ Import file
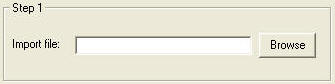
There are 4 steps involved in importing -
First, select
your file:
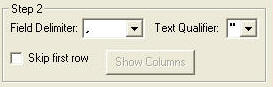
Second, Choose the delimiter, text qualifier or enter your own,
then select if you want to skip the first row upon import [if
the first row is the field names]
Third,
Choose a pre-made field map
for upgrades, or the WebDebit import file - or map the fields
manually below and then title your map and save it for later use
on the same file type.
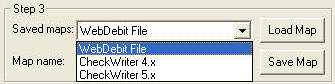
If you are upgrading
from 4.xx to 5.xx, select to import the CheckWriter 4.x file.
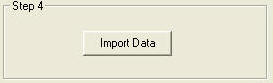
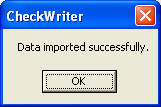
Last,
Click Import Data. If you
have a large file, be sure to wait until you get the success
message.
If you have a large file, be sure to wait until you
get the success message.
If
you are using the WebDebit
import feature, please read the following:
- Below is a sample import file: Top
- Your Internet form, or shopping cart
should be configured to output to a text file much like
this one. Support on this feature is limited to
successfully importing the sample file below. No support
is available for user files.
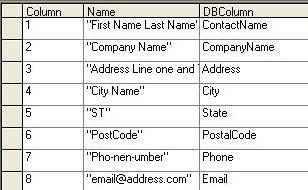
If you cut and paste the file below to a text file, and save it as something.txt, you will be able to use CheckWriter's WebDebit™ Import feature to automatically enter this sample check.
_____________________________________
Field order key: [do not use this for a sample file]
"First Name_Last Name","Company Name","Address Line one and Two","City Name","ST","PostCode","Pho-nen-umber","email@address.com","CredtiCardNo.","exp","Name of the Bank","Bank City","ST","Fraction Code","1234","account_number","routing_number","MEMO FIELD Optional","Uliminted Data for Notes Field","Notes","Notes","Comments price field must be 4th to last field","TOTAL_USD","1 Jan 2006","ANY_required","ANY_required"
______________________________________
Sample Generic Form:
Top
If you want to save it to your hard drive to manipulate the form, just go to the FILE menu on your browser (Netscape or Internet Explorer) and select save.
- You are responsible for configuring the form and the submit button. You are also responsible for the security of the form. If you cannot configure the form, or do not know how, or if you do not have a secure server and need one, yourfavorite.com can provide both design and hosting services for the generic form for a very low cost. We can also provide a shopping cart that works with CheckWriter.
Shopping
carts and Order Forms are
available by
clicking HERE.
EXPORT:
Top
The easiest way to export your entire database in any order you
wish is using the export feature from the File Menu.
Simply map the export order and click Export - choose a file
format, text or csv and save.

ALTERNATIVE EXPORT:
You can also export data from CheckWriter, by switching to TABLE MODE.
This has more limited mapping, but will export just the reports
you run.
Use the search features to select the group of records you wish
to export. Next go to the file menu and select Export.
The program will prompt you to title the export file. Next
click open. CheckWriter will then create a CSV file or
text .txt file depending on your selection.
You can also export right from the Print Menu. After you
select your group of checks or drafts for display in Table Mode,
click the export icon on the tool bar just to the right of the
printer icon and the following screen will display.
Select the export file type of your
choice and click OK. This will save to just about any file type
available.
OPTIONS
MENU:
Top
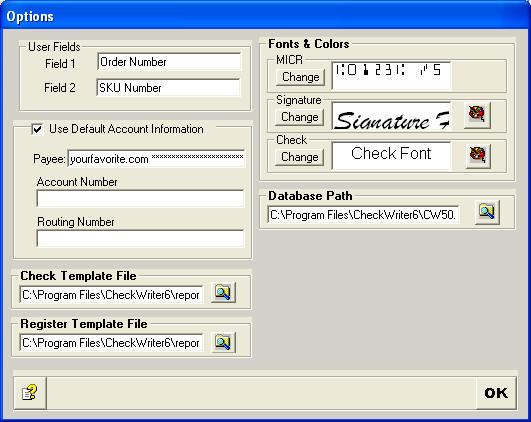
The user fields can be titled anything you choose and are fully
searchable. Simply enter any name you choose for user
field 1 or 2 and this name will appear on the record view for
any entry.
Use this section if you want default information filled in for
each new check. Say you always pay checks to yourself,
enter your name or company name in the payee field and you will
not need to fill it in each time. If you print multiple
checks on the same account, your own perhaps, then enter your
account information here as well.
Checking or un-checking the "Use Default Account
Information" box will activate and deactivate this feature.
File Path options:
Top
Only use these options with the assistance of technical support.
Database path is available on the Network and Enterprise Edition
only.
Font Options:
Top
You can change the MICR font, the signature font, or the check face font
to fit your needs. We suggest you leave this section
alone, as everything is pre-set and if unaltered, your drafts
will print properly and be fully compliant with all banking
regulations
We recommend you use MICR E13 B 12 pt which is the default for
the MICR.
We recommend you use Brush Script MT, Italic 22 pt for the
signature font.
We recommend you use ARIAL 10 pt. for the check font.
Security
USERS MENU:
Top
The default Username and Password for all versions is
'admin' and 'admin'.
For the Single User Version, you can change the password, but not the username or options. All Single User Version have just one user 'admin' and all permissions are pre-set.
For the Network
Edition and Enterprise Edition, you can choose to create new
users and you can assign any level of permissions to these
users.
To create a new user, up to the total number of licenses you
have, click the New User button and enter any username and any
password, then click Save.
![]()
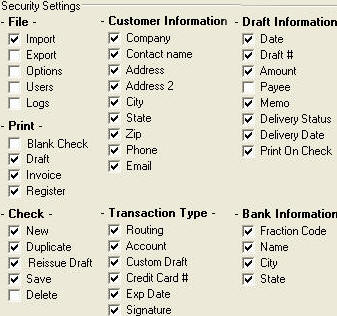
To set permissions for each user,
uncheck the boxes that correspond to the functions you want to
lock out.
In the example below, the user has been locked out of the
most compromising functions such as Export, Options, Users,
Logs, Blank Check printing, the ability to Delete a record and
the ability to alter the Payee.
[It is
strongly recommended with the Network Edition and
the Enterprise Edition to always lock out the Delete function -
except for the administrator, as this could cause database
locking. If all users do have permission to delete,
deleting should be done only when a single user is connected.]
USER LOGS:
Click on 'Logs...' in the file menu to see a detailed log of each user, the date and time the logged in and what they did. The log will show the changes made to each record, and includes all fields.
BLANK CHECK:
Top
This command allows you to
print a totally blank check with no amount, payee, signature or
pay to the order of, however, you can print the account name and
the bank routing and account number, allowing you to print blank
personal or business checks that can be used at retail locations
or to pay bills.
CHECK:
Top
Select this option to print a check draft from the record you
select. After selecting this option you will have a
choice:
Select yes and
CheckWriter™ will print a top check, a check stub duplicate check
on the middle portion and a receipt that can be inserted into a
standard #10 business envelope on the bottom portion.
Select No and CheckWriter™ will print 3-per page
checks. This should be used only with 3-per page check
stock during a batch print.
INVOICE:
Top
Select this option and CheckWriter™ will print an invoice for the
selected record. You can tri-fold this invoice to fit a
standard #10 window envelope.
REGISTER:
Top
Select this option and CheckWriter will print the register for
the current selection of records. If you have a large
number of records, you may want to split up printing by
selecting categories. The register report also calculates
totals.
NEW:
Top
New
allows you to add a fresh, never before entered customer profile
into the database. When you select this option an empty record
appears. You may begin adding, and use TAB to move between fields.
DUPLICATE:
Top
This allows you to make a new, or duplicate copy of an existing
check without re-entering data. Select this option and
CheckWriter™ will enter new payment data in the notes field and
queue the new check to print. Be sure to update amount and
check number fields manually. The date will update
automatically and the check number will advance by 1
automatically. Never overwrite old data or you will lose the
history in your database.
REISSUE CHECKS:
Top
This allows you to set up monthly or periodic billing.
Simply enter the number of payments to be made and the day of
the month the payments are due in the records you wish to
bill. Then, when you want checks to issue, select reissue
checks from the check menu and all checks within the specified
date range will be queued to print.
![]()
An entry such as above would issue 5 more checks on the 15th of each month. After reissue was selected, it would change to 4 and 15.
SAVE:
Ctrl + S
Top
Use this option
to save an existing entry after it has been updated.
DELETE:
Ctrl + D
Top
Use this option
to remove all traces of a customer’s record in the database.
The program will ask you for conformation before deleting a
customer record.
FIRST:
Top
This function will automatically go to the first record in the
database.
PREVIOUS:
Top
This function will automatically go to the previously viewed
record in the database.
NEXT:
Top
This function will automatically go to the next record in the
database.
LAST:
Top
This function will automatically go to the last record in the
database
TABLE VIEW:
Top
Select this view to see all records as a table. This is
where you perform searches and do batch billing and printing.
RECORD VIEW:
Top
Switch to record view to enter new customers, scroll, or view
any selected record from table view.
CHECKWRITER
HELP:
Top
Click this option to view the manual.
ABOUT:
Top
Click this option to
see version and system data.
EXIT: Top
Select Exit to quit the program. Restarting will require a password.
Customer
Information:
Company:
Top
Enter the name of the company writing the check. You can select
to print or not print this information on the face of the check.
[required or contact name required]
Contact
Top
Enter the
customer’s name in this blank, this information can be
included or excluded from the face of the check, just like
"Company." [required or company name required]
Address:
Top
Put Street Adders of customer here. Include any unit numbers on
this line also (i.e. 84 Gainsborough St., Suite 105W) This is
what will appear on the check in the address box. [strongly
suggested but not required]
City, State, Zip:
Top
Enter the city, the state and the zip code of the customer in
the respective fields. [strongly suggested but not required]
Phone:
Top
Enter the customer’s primary phone number. [strongly suggested
but not required]
E-mail
Address:
Top
Insert the customer’s E- mail address here. [not required]
Record View Entry Screen:
Transaction
Type:
Top
Standard: Top
Standard format is:
C00123C A011000206A 1234567890C
which is the same as
A011000206A 1234567890C 00123C
and can be written either way.
Select standard format if you get any check with a 9 Digit routing number, 6-14 digit account number, and any number check number. 99% of your checks will be like this.
Routing Number:
Top
Enter the customer’s bank routing number, usually 9
characters. This can be easily differentiated from the account
number by looking at the fraction code which has the routing
information in a similar format.
Routing numbers are always between the
|: symbols like this
|:011075150|:
Version 5.0 and later have a built-in routing number
verification routine that will run the check digit of the
routing number against a mathematical formula. If this formula
matches the check digit, your routing number is a possible
match.
On rare occasions, this utility will be wrong. Some credit
unions and older branches still use NON STANDARD routing numbers
that do not comply with the formula. It is always best to
double check if the routing number does not verify. [the routing
number is required to process a valid check or draft]
Account Number:
Top
Enter the customer’s account number in this blank. Usually 10
numbers. [account number required to process a valid check or
draft]
NOTE: If the routing number and account number have the ‘D’ or
D symbol or take on an unusual format, you should select Non-Standard format.Non-Standard:
Top
Use this option for Non-Standard
checks from
- Credit Unions
- International Checks
- Alternative Accounts
- Money Market Account Checks
- Other Non-Standard formats that use MICR
CUSTOM CHECK:
Top
If you receive check information that does not come in the
standard format, you will need to build the account encoding
yourself.
Enter the check information using the code supplied when you select the Non-Standard option. It should be A=
A B=B C=C D=DIf the account
was
A011000206A
0423D25410D21100C
You would enter
A011000206A 0423D25410D21100C
Credit Card:
Top
Select this option if your customer is paying by credit-card.
Simply enter the card number and expiration date. CheckWriter
will not authorize the card but will file the information on
your customer and make it available for reports and searches. If
you are importing numbers of orders to CheckWriter, you can also
import the card orders. You can use the invoice feature to
print an invoice, or assemble the new card orders for export and
import them into another credit card authorization program like Authorize.Net.
SIGNATURE
OPTIONS:
Top
Select the signature option that most suits the
situation.
Not Required is the default setting. This option
will print a signature disclaimer on the draft stating that
there is no signature required and the draft is authorized by
the depositor. This should always be used for drafting.
Required
prints the draft with a blank, allowing the actual account
holder to sign their name. This option can also be used if
you have a signature stamp to use on the draft. This is not
intended to be used for printing checks.
The Facsimile option will print a signature Facsimile in
a script font with a disclaimer underneath the scripted
signature stating the signature is a Facsimile. Use this option
for printing rebate checks, large run items, payments from your
own account, but not for drafting.
Date: Top
This will automatically update to today’s date when you are updating a record, but if no updates are made it will remain the date of last update. You can change this field at will. [automatic and required]
Check #:
Top
Enter the check number the customer wished to use for payment.
You can use 0000 if there is no check number available. This
will appear as 0 in the check number field, but all check
numbers will print as 4 digits or more on the check face.
Leading zeros beyond 4 characters are dropped automatically.
[required that at least 0000 be entered]. CheckWriter prints
drafts to regulation with check numbers up to 8 digits. If
you are drafting a check with a check number that is longer than
8 digits, enter the first 8 digits from the right - so if the
check number were 123456789 you would use check number 23456789.
Amount:
Top
Enter the amount of the check you are writing. [required]
Payee:
Top
Here you can override the default payee and enter any payee you
wish. This is what will appear in the Pay to the order of
field on the check. [required]
Delivery Date:
Top
Use this field to enter the date the product was or should be
delivered. This is a reference field only and does not effect
check printing. Many people use this field to do monthly
billing. You can search for the bill date and charge all
customers with a delivery date of that day. [not required or
part of the draft]
Delivery Status:
Top
Use this field to update the status of a delivery. This is a
reference field only and does not effect check printing. [not
required or part of the draft]
Print On Draft:
Top
CheckWriter will automatically print the company name on the
draft if both company and contact are entered. If you enter just
a contact name, CheckWriter will automatically print only the
contact name. The same applies if you enter only the company
name, CheckWriter will know to print the company name on the
draft.
To change this manually, use theh Print on Draft drop down box
to select if the draft is to display the person's name or the
company name in the top left of the check. The default is
Print on Draft: Company.
Memo:
Top
This information will be printed on the memo section of the
check and on the stub, mailer stub and invoice. [not required -
will print on face of check]
Bank Name:
Top
If the customer
is paying by check the name of the customer’s bank goes here.
This is printed on the face of the check. If the customer pays by credit
card, you may choose to enter the card type or bank name here.
[advised but not required - if unknown lookup in RoutingTool]
Bank City:
Top
Enter the city or
town, and state the customers bank is in. This will also print
on the face of the check. [not required]
Fraction Code:
Top
Enter the
fraction at the top of the customer’s check. It should look
something like this (5-20/110) Note: If you have multi-line
fractions such as:
5-201/4587 (32)
0254921100
It should be
entered as only the top number. Omit the bottom code. This is
not necessary to process the check.
Some checks will not have a
fraction code at all, this is also okay. Use the fraction if it
is available, but if not, your draft will still be processed.
[fraction code not required]
Notes:
Top
This section can
be used for absolutely anything. Take notes here to cut and
paste into check fields, make account notations for future reference, type anything here, even paste info in about your
customers. This will not appear on the check, but will appear on
the invoices. Duplicate check history is stored here as
well.
![]()
FIRST | PREVIOUS | REC'D# of TOTAL | NEXT | LAST
PRINT DRAFT | INVOICE | TABLE/RECORD VIEW | HELP |EXIT
-----
![]()
![]()
Search by any field in the database.
![]()
Showing all records may make reporting or printing large batches unmanageable.
![]()
Try to narrow your search. This is more manageable:
![]()
![]()
Searching for unprinted checks will bring up checks just imported,
checks queued after re-issue, or manually entered checks that have
not yet been printed.
![]()
![]()
Select a date range to view and run checks or reports based on this
criteria.
Quick Searches:
![]()
![]() To
do a quick search, use the binoculars toolbar button. Put
your cursor in any field, then click the button, enter the
search criteria.
To
do a quick search, use the binoculars toolbar button. Put
your cursor in any field, then click the button, enter the
search criteria.
For example, to search for a record in zip code 02115, click the
zip code field in the software's main screen, then click the
binoculars. Enter 02115 and then search - All records
matching your search will be displayed for you to scroll though,
or flip to table mode and run a report or export from the
results.
CheckWriter™
is trademark product from yourfavorite.com.
© Copyright 1996-2012 All Rights Reserved.